How to Improve Fast – 7. The Automatic Pole
by Luis Soubie – SCIRA Commodore
There are few things worse on a Snipe than rounding the leeward mark without the pole retracting correctly. If this happens, we probably won’t be able to sheet in the jib completely and those who round behind will pass us while we solve the problem. Snipe pole rigging can only be PERFECT or BAD; in my view, there is no middle ground.
There are many factors that can cause the pole to function imperfectly. Let’s look at each part and analyze what it needs:
1) Hardware
i) The tube must be straight and in good shape. If it is bent or has a bump, the slide will not run smoothly. Even severely scratched poles may cause problems; this can be solved by sanding them with 600 sandpaper and applying a little polish.
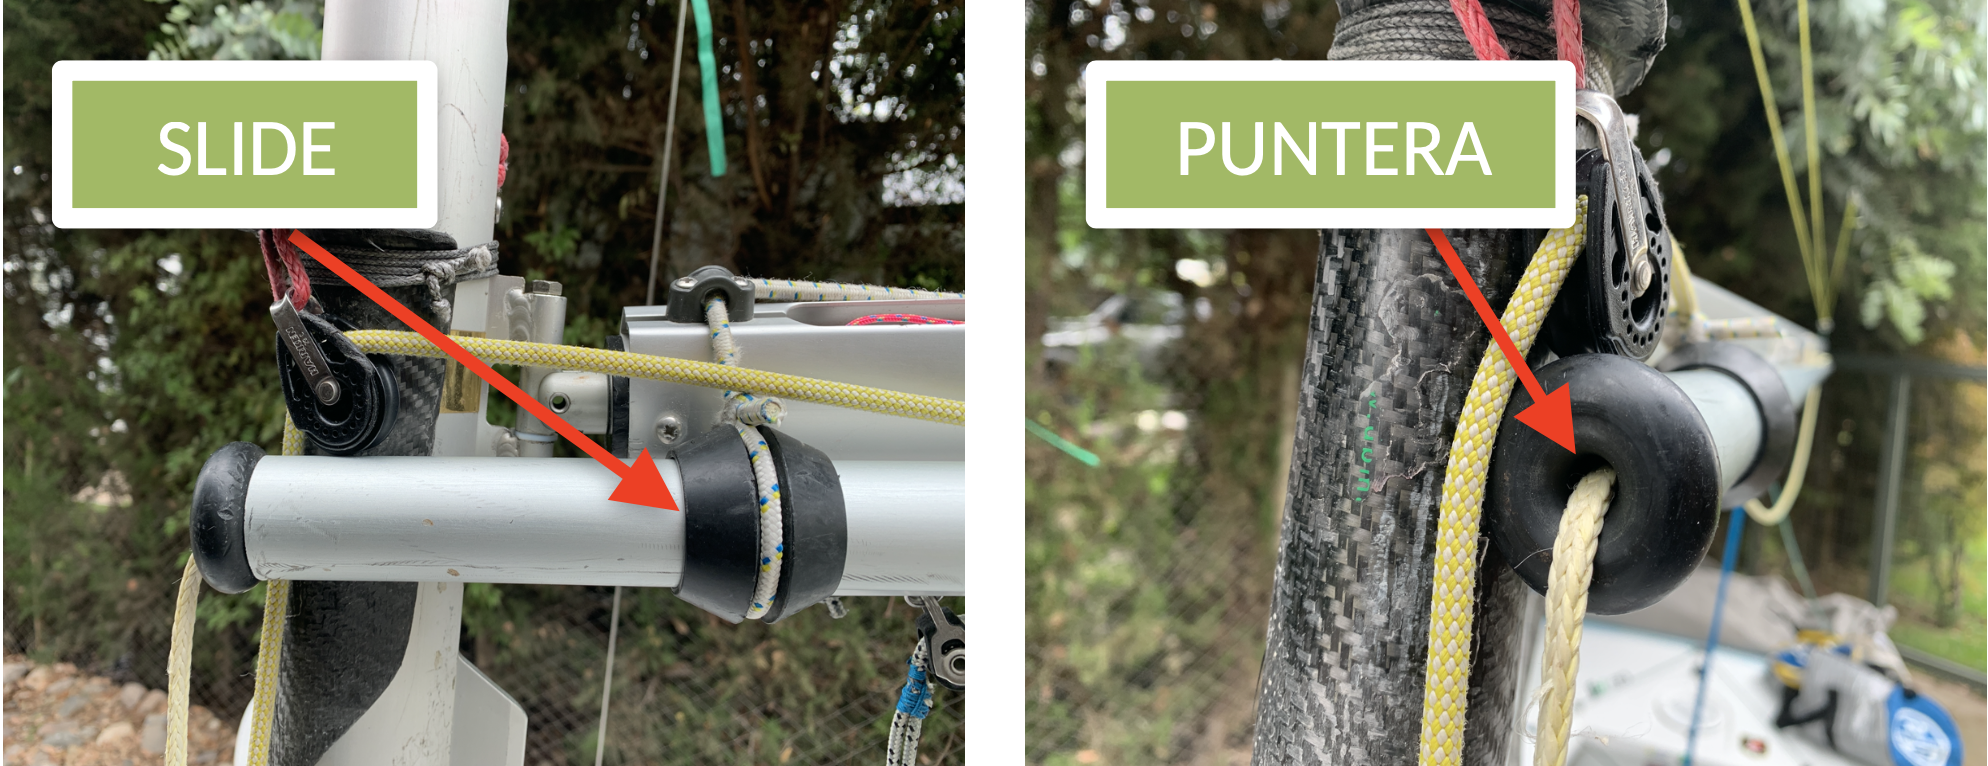
ii) The slide must run free and must have an adequate curve, be rounded and smooth, and be in good condition. Verify that it is not worn by the rope.
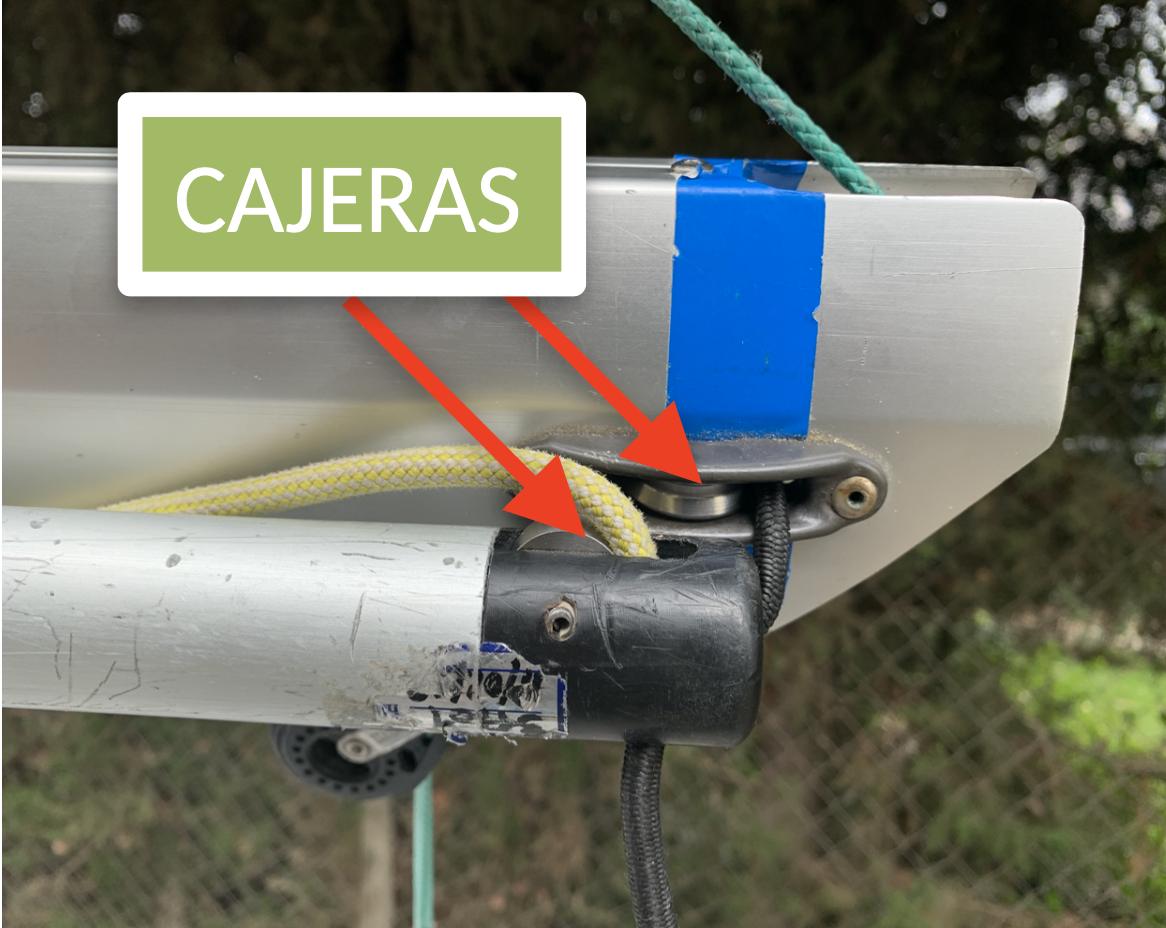
iii) Both exit blocks must be of good quality, with ball bearings. They should be lubricated often with a non-greasy lubricant. Check that they run well and that the rope does not rub on the sides.
2) Line system setup
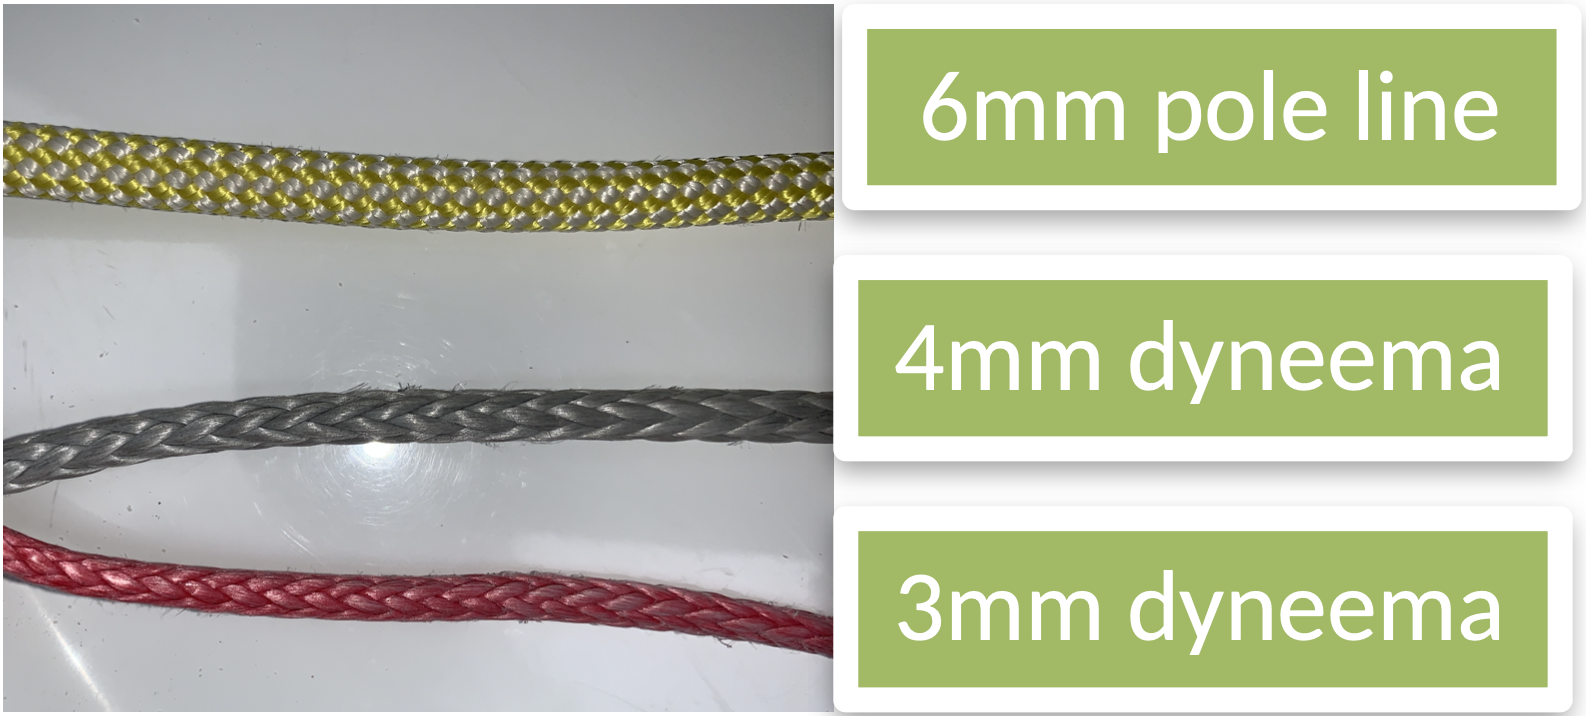
i) In my opinion the best line is 4-6mm thick, fairly stiff and not fuzzy, because any “hairs” are likely to tangle and generate friction. A thicker line creates a lot of friction and is too heavy (especially once it gets wet). A thinner line gets tangled and wears both pole tip and hands. I used to use 4mm to make it run better; now that I’ve improved the entire system I use 6mm, which has great advantages on windy days and still runs perfectly. It should also not absorb wáter, because it will hang away from the boom and be too heavy.
ii) The block on the mast must rotate freely. Check that the line leads through it without rubbing. One sign of a poor setup is wear on the plastic side of the block.
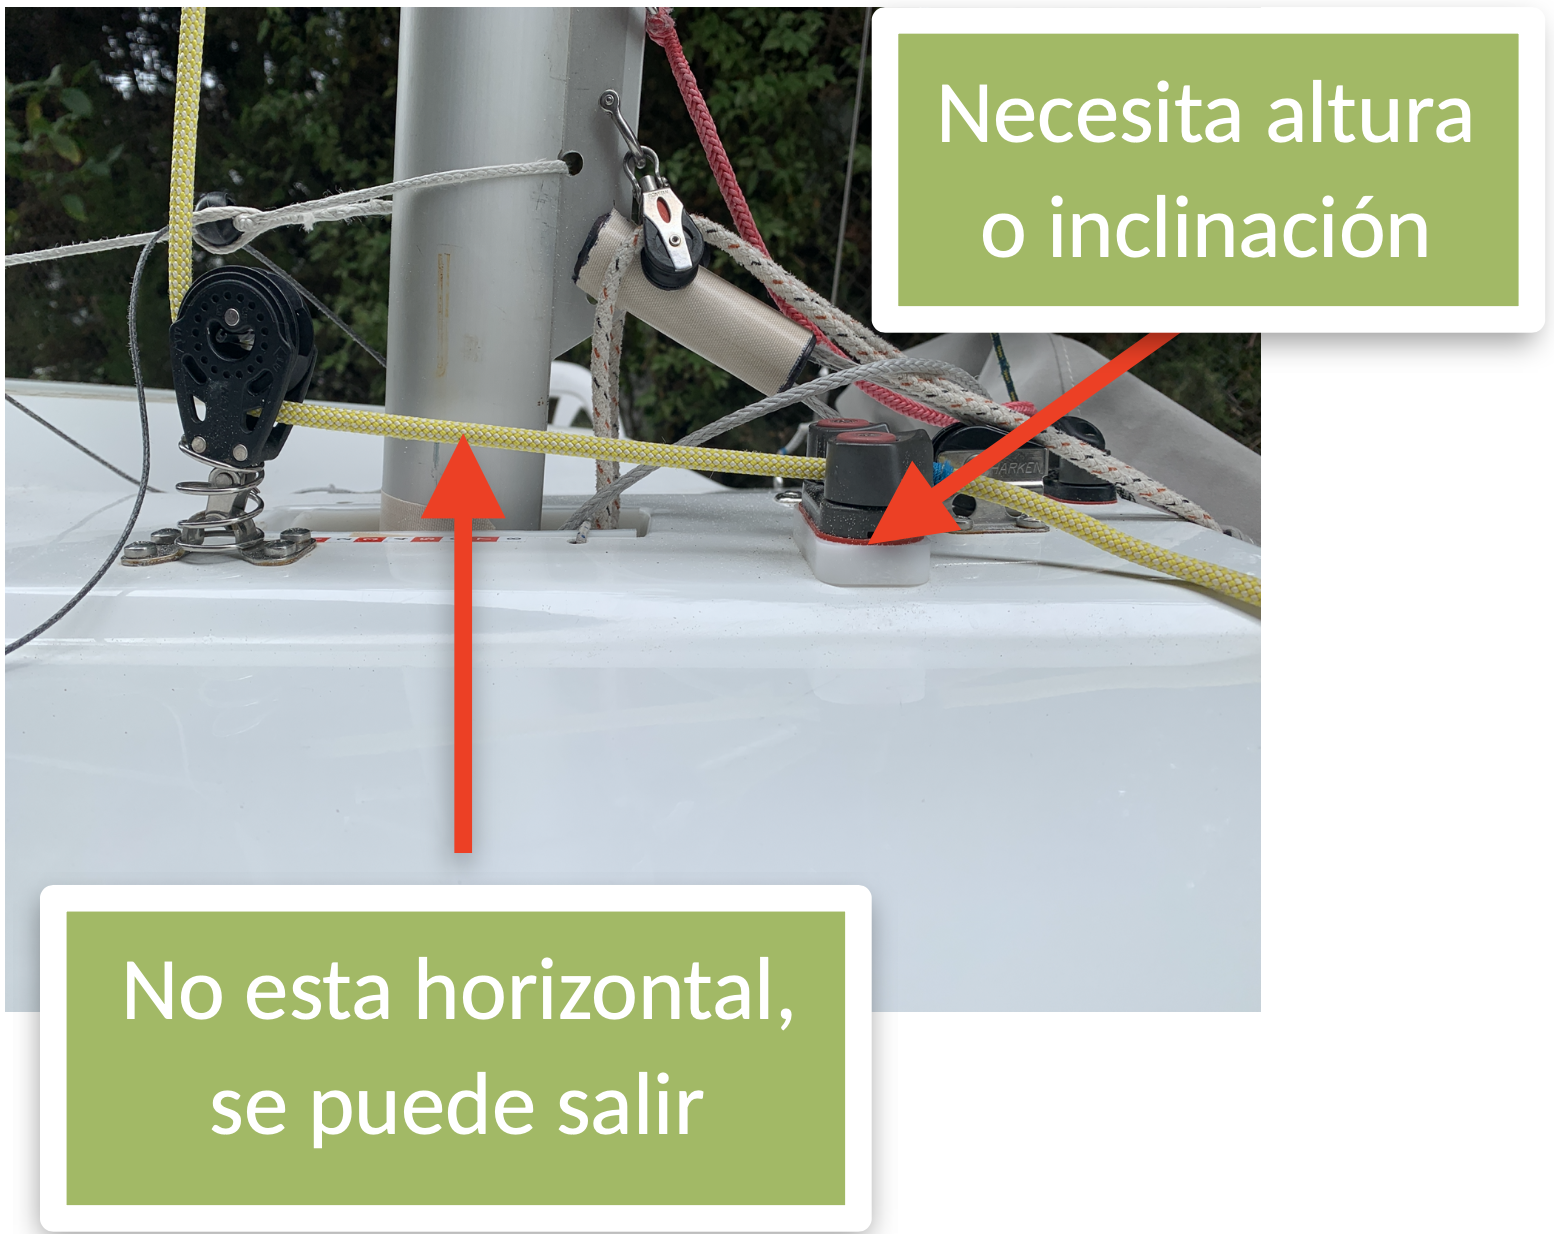
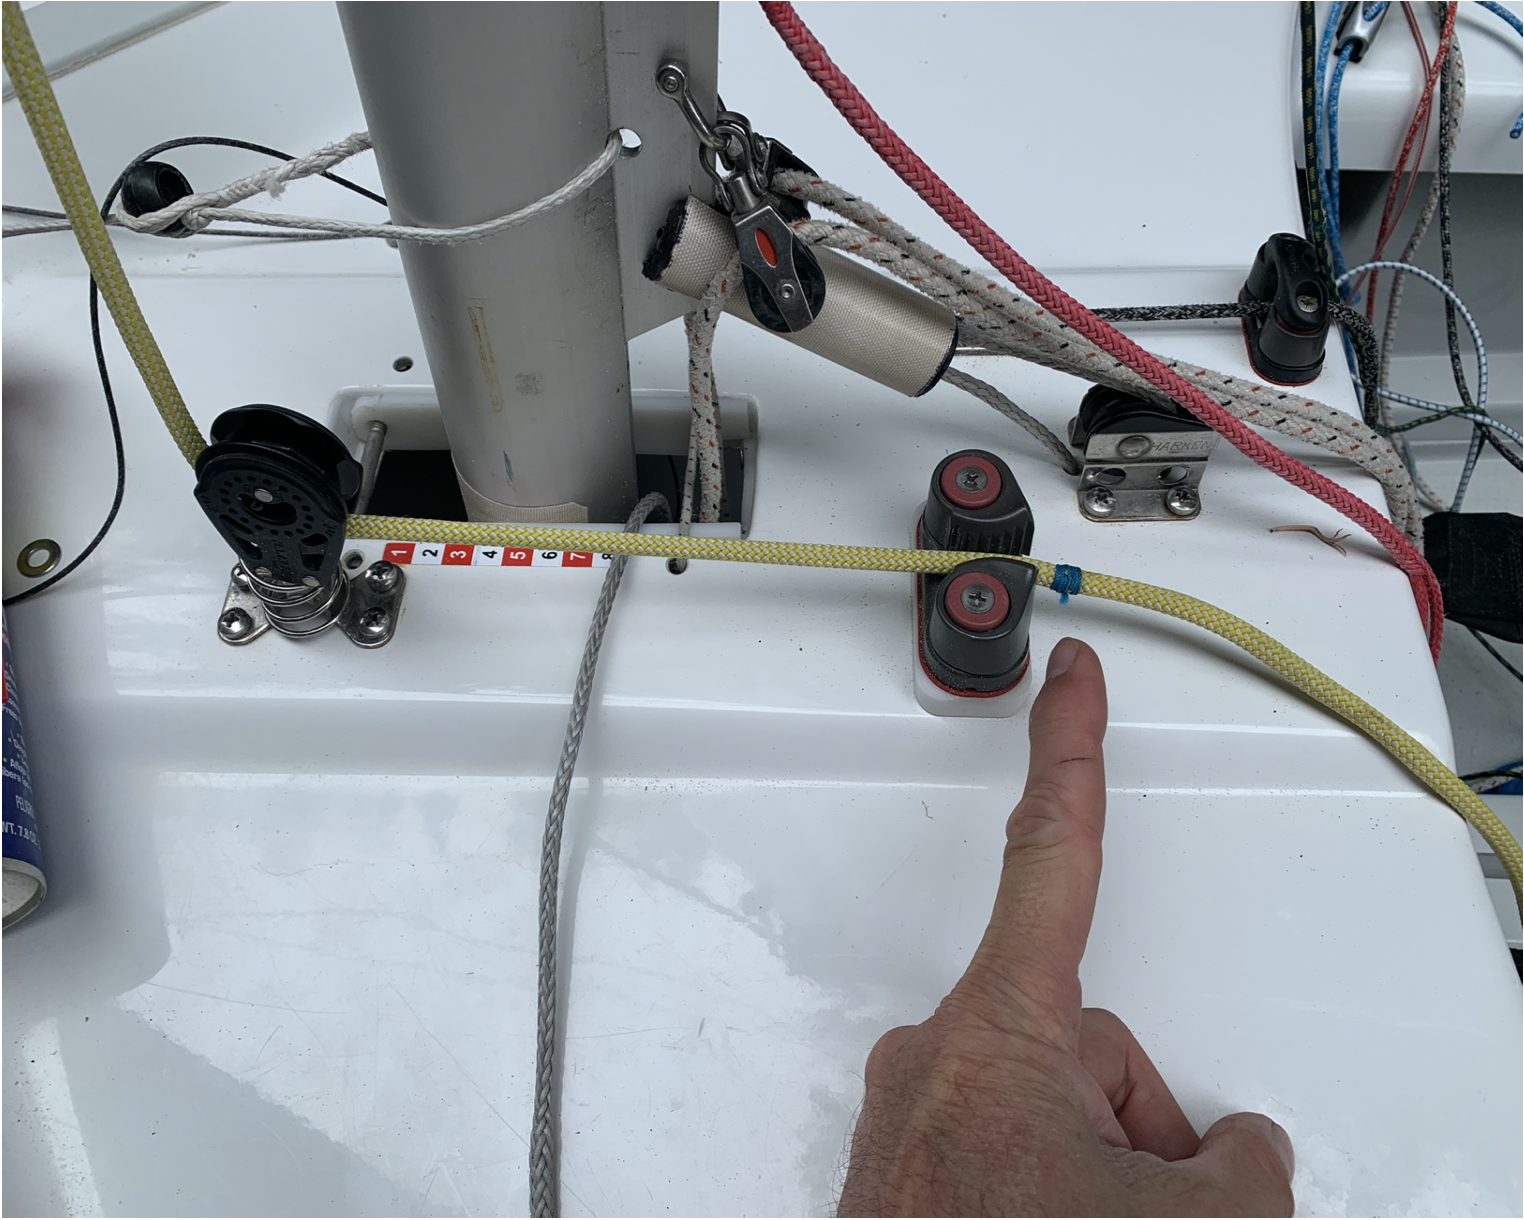
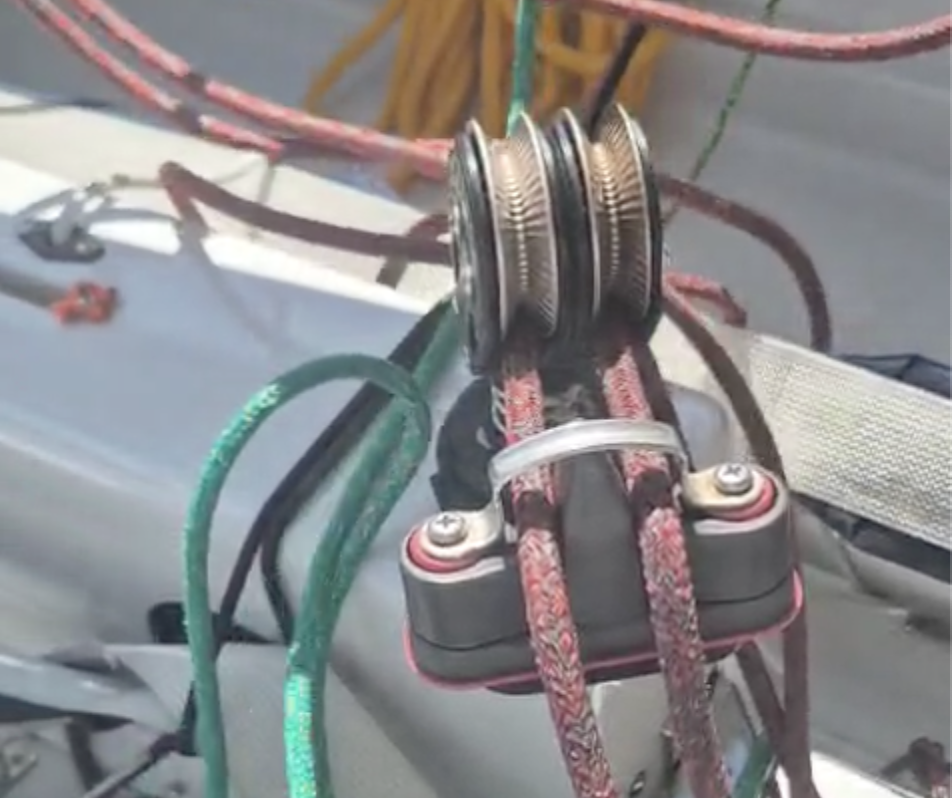
iii) The ratchet block on the deck should be as small and as low as possible. The line must be horizontal back to the cam cleat (which MUST be an aluminum Harken 150, not plastic). If the block is too high (see photo), the cleat must be raised to prevent the line from uncleating itself in windy conditions.
iv) I don’t like the fairlead that some people add to the cleat, or the extra block aft of the cleat. Both add a lot of friction to the system and are a constant cause of problems. It also forces the crew to change hands during the maneuver. The best pull is straight from the ratchet block through the cam cleat. I know that many use it; I just don’t like it.
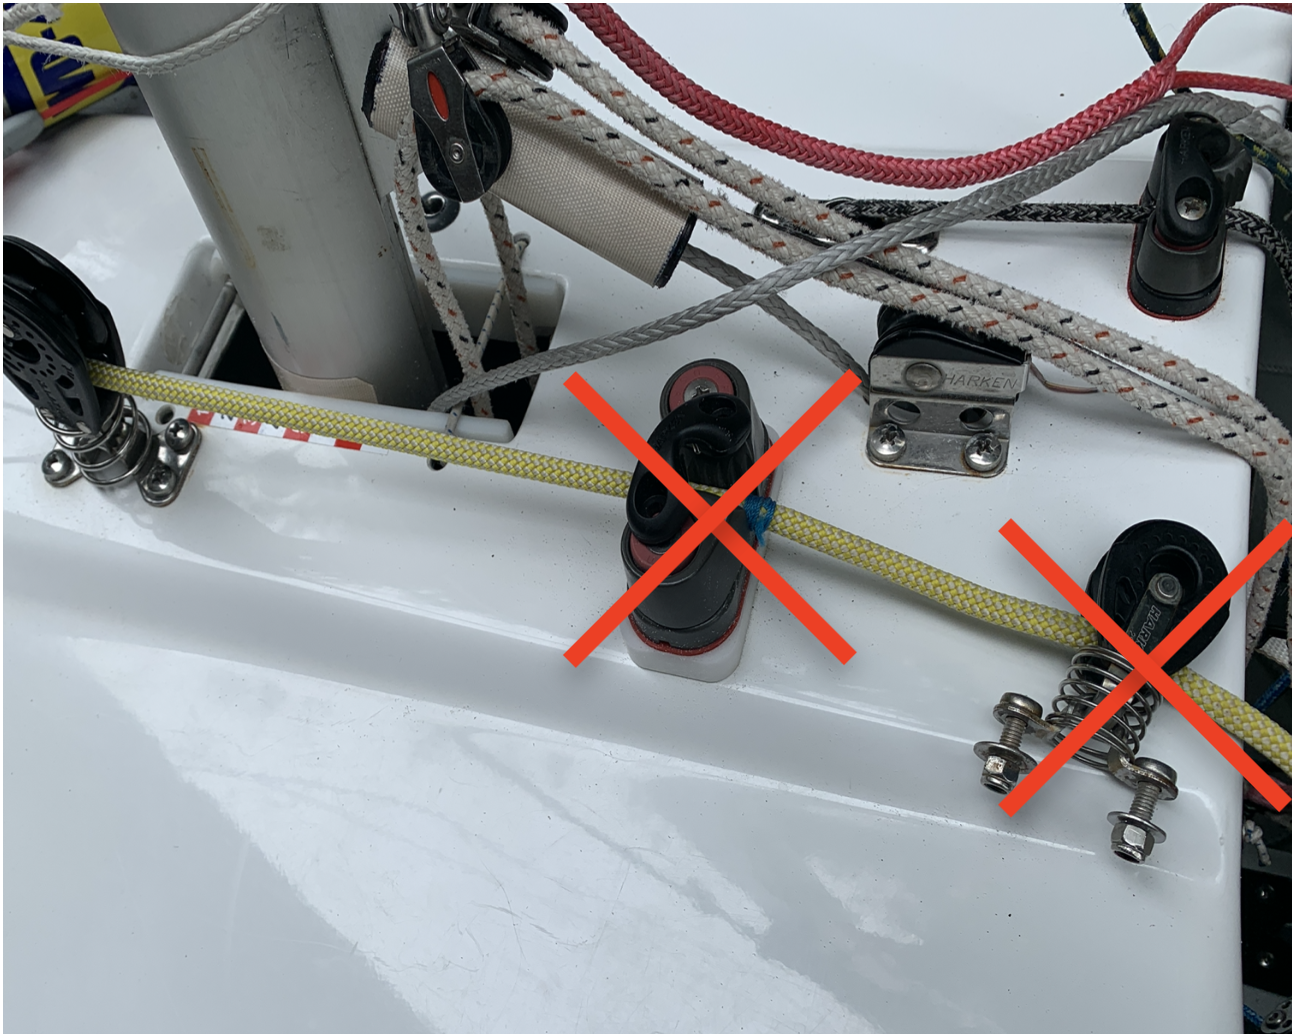
v) Some people hang a block on a thin piece of shockcord from the spreaders to keep the pole line out of the way when tacking. This only adds another element of friction, and it also shortens the pole by 1-2cm (because this block is caught between the exit block and the block on the mast). Sailing upwind, it disturbs the flow over the main. Personally, I don’t understand why people still use it. Instead I sew a mark on the pole line, and my crew cleats the line at that mark. (You could tie a knot instead.) The pole line is too short to drop below the boom and is never a problem.
Perfecting the entire launching system is essential. If the jib clew doesn’t go right to the tip of the pole when launching, the crew will have to fix it after each maneuver. (Surely it’s happened to you.) In a lot of wind, that can be a serious problem. This is due to excess friction in the rope system and / or lack of force in the elastic and / or excess friction in the elastic system. FRICTION = ENEMY. Always. Which brings us to the most important part of a perfect pole system…
3) Shockcord retraction: There are basically two systems, one with 2 turns of shockcord inside the boom, and the other with 3 turns. Both can work well, depending on the choice of shockcord.
i) 3-turn system:
* Advantages: the shockcord is under less load, so it lasts longer. It also requires less than 100% of maximum stretch. This is best for small crews with less strength.
* Disadvantages: More friction and more weight in the boom, and you must set it up with a higher initial load.
ii) 2-turn system:
* Advantages: Less friction, lighter, and a higher retraction force when launched so you can set it up with less tension.
* Disadvantages: Requires shockcord of more than 100% maximum stretch, and shockcord must be replaced more often. Requires more crew strength.
e) Choice of shockcord
i) Using the maximum stretch of the shockcord is KEY.
What I mean is that choosing the correct stretch, (so choosing the correct elastic), is KEY. Not to use his maximum stretch. In fact, as more far of the maximum stretch we are more it will last.
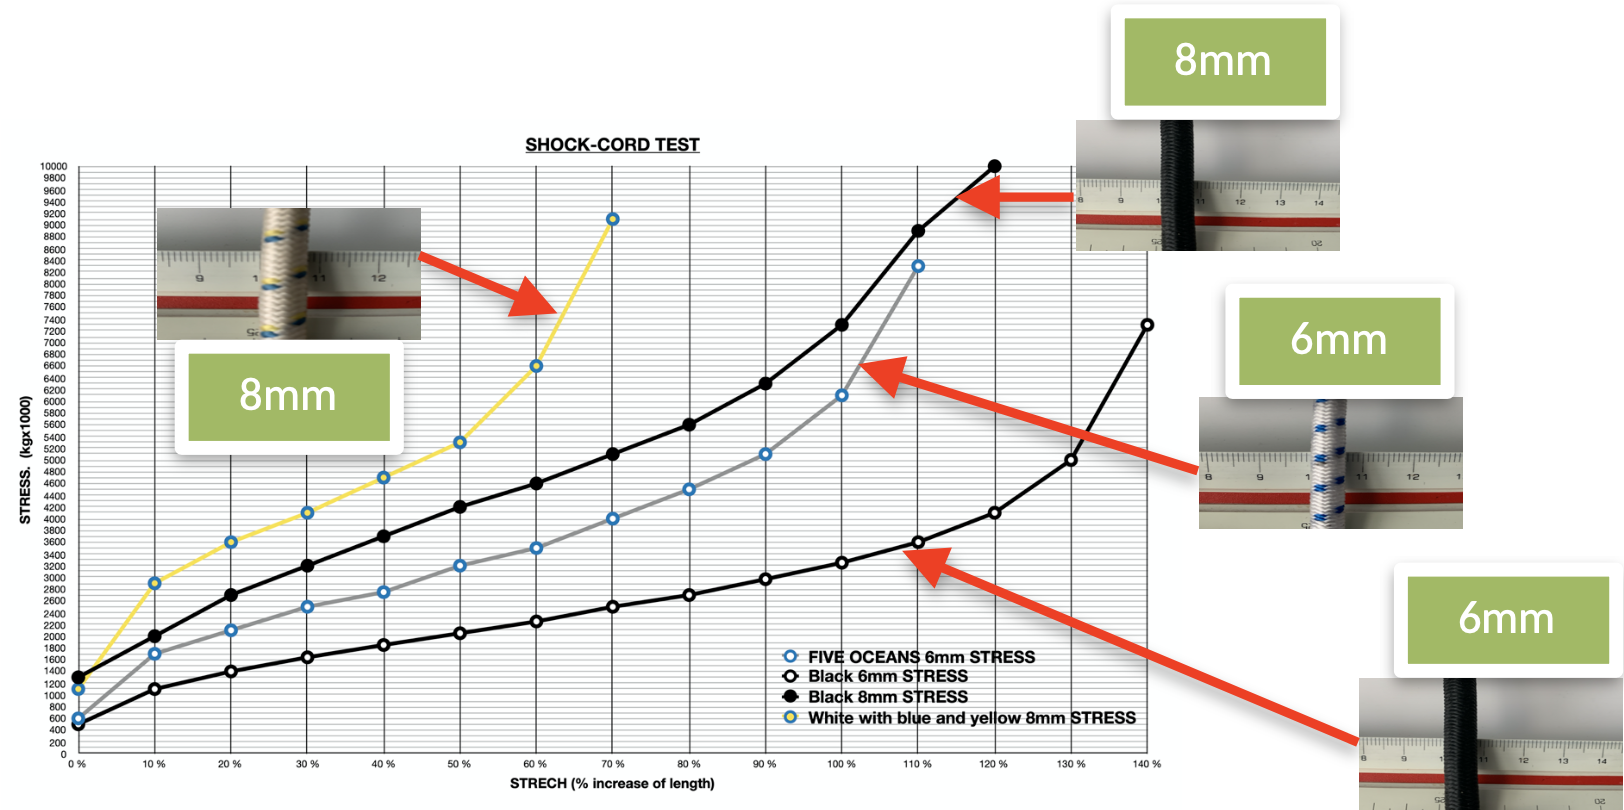
This can be easily measured by measuring it first under no load and then stretched to its maximum. Maximum stretches for different types vary between 70% and 150%.
ii) The shockcord must be in good condition and the cover must not be too fuzzy. Over time and especially with salt wáter use, the rubber rots; it must be replaced at least every 2 or 3 years or as son as it loses its properties. If it is left in the sun or is used a lot, it should be changed every year. In addition, once it is worn out the fuzzy cover produces a lot of friction. And friction = the ENEMY!
iii) The elastic should never be loose.
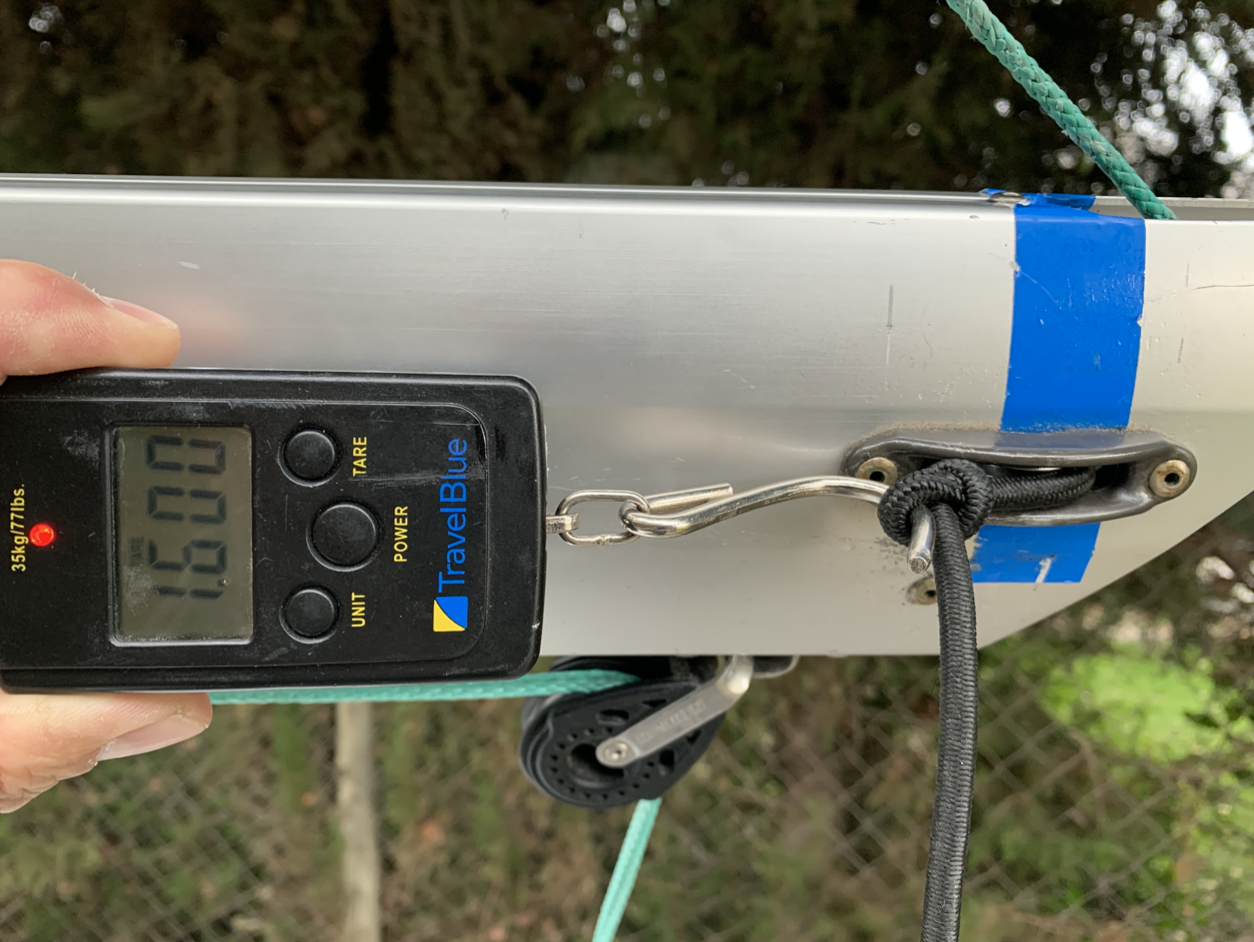
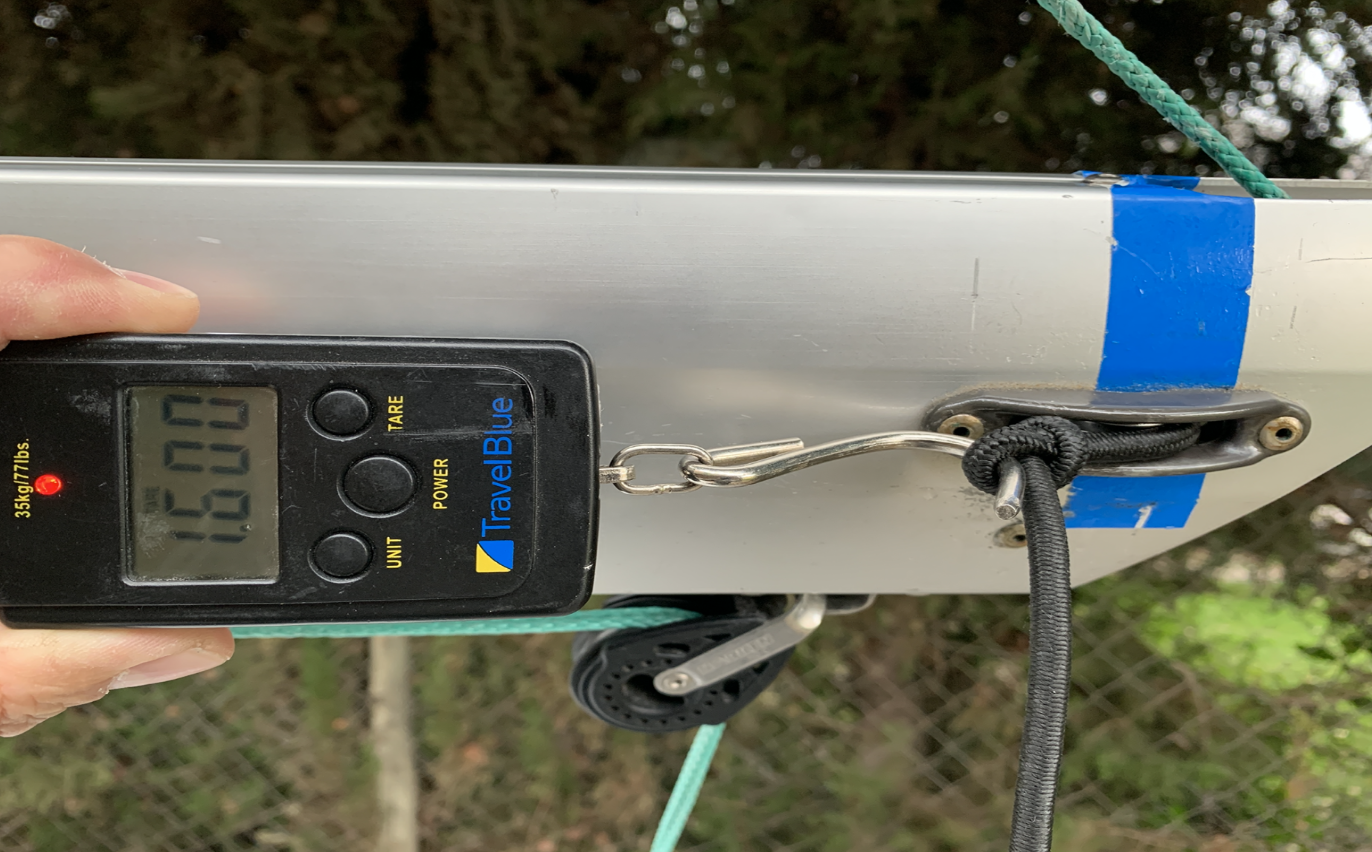
It should always be at least 20% stretched so that the pole stays close to the boom as it retracts. This 20% stretching while “at rest” is necessary, because the initial force of the shockcord before launching should be between 1.5 and 2kg.
iv) Starting from this point, a two-turn system will reach a force between 3.5 and 4kg on the shockcord in its most stretched position (pole out), which is very good. If the system has three turns, the final force will be about 0.5kg less, since the stretch is 33% instead of 50%.

I tested the various shockcords that I have used over the years to measure both strength and stretch. On this graph, up is STRENGTH and to the right is STRETCH.
As you can see in the chart, the elastics behave linearly in the middle part of their development, but not in the extremes. Both at the beginning and at the end the force rises abruptly. In the beginning because the fibers are “getting organized”, in the end because the “cover” begins to resist.
Most of them deliver more than 5kg with ease, which is much more than we need. Also, remember that the “nominal” 2kg (obtained in the experiment above) is equivalent to many more kg in the actual system, due to friction.
For my two-turn system and using the 6mm black shockcord, that initial 1.6 kg was obtained with 90cm of stretch in 500cm of shockcord (18% of real stretch). According to the graph, that should give us 1.3kg of force instead of the 1.6kg that I have to do to stretch that 90cm.
At the end, by stretching the elastic 50% more (we stretch a boom length in a two-turn system), we should have 2.3kg of force or 68% of real stretch, but instead of that we have 3.7kg! This 1.4kg difference is all due to friction. And friction obviously increases when the pole is going out, and decreases when it’s retracted—in both cases, the opposite of what we need.
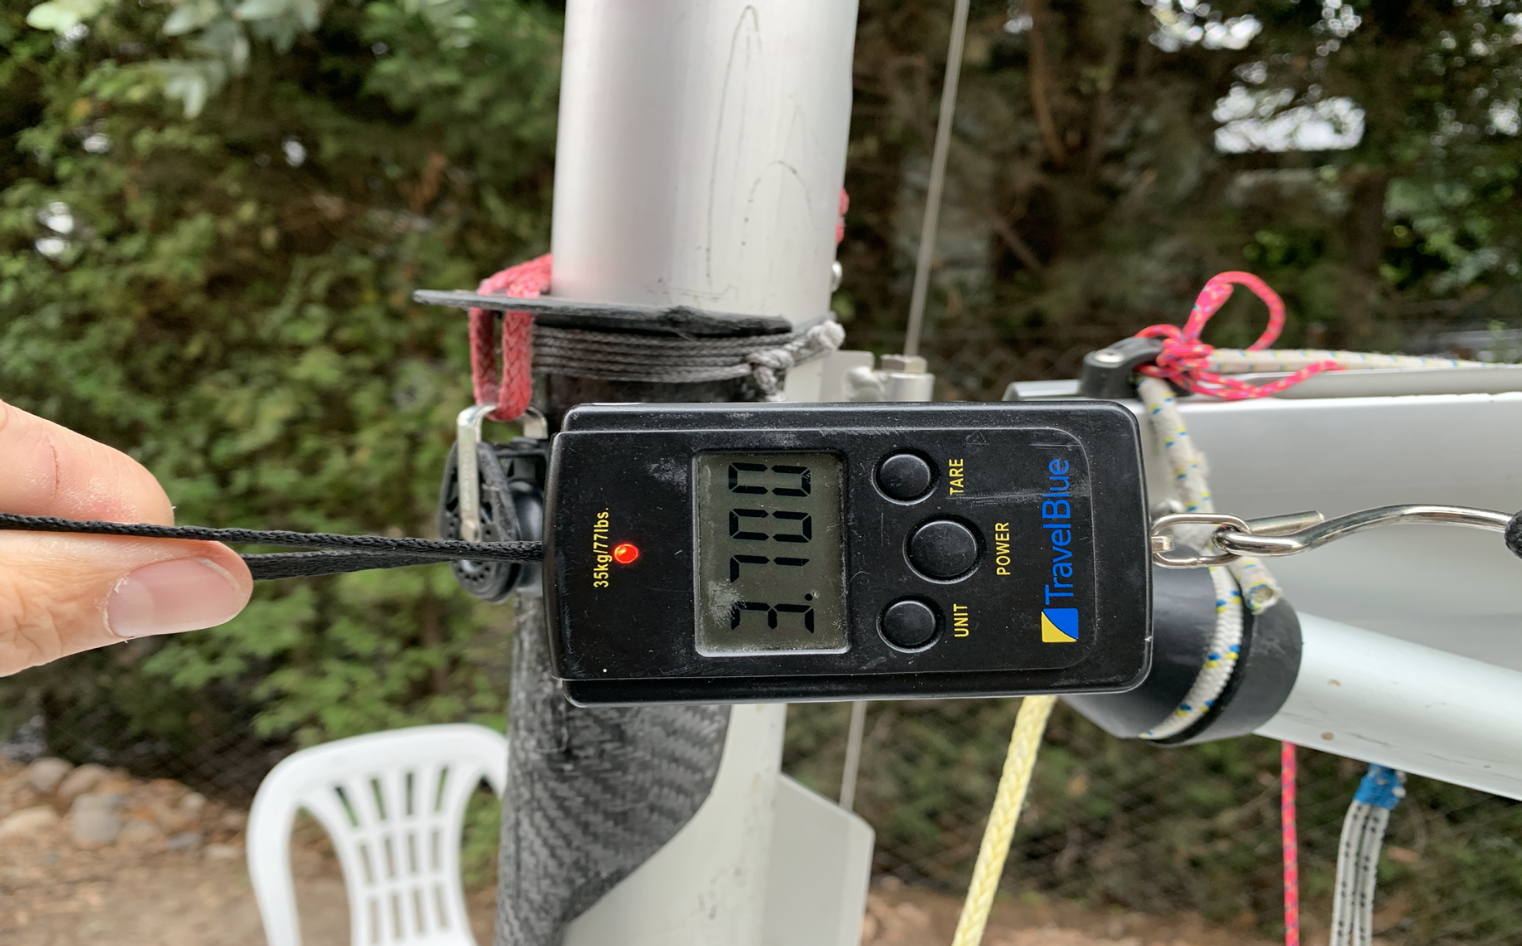
It is important to note that these final 3.7kg correspond to a nominal elongation of 110% of the shockcord used. That is why it is important for two-turn systems that the shockcord tolerate 130% / 140% of stretch, so that they are not working at their limit. The end of the shockcord that is tied to the pole is effectively stretched (according to these 3.7kg measurements) by more than 100%. If we could measure the strength of the first section of shockcord inside the boom, it would perhaps have less than 2kg of force and very little stretch. In other words, the stretching is not even along the shockcord, since passing through each block causes friction; the shockcord stretches more and more in each successive section. All due to the hated enemy friction, which is why it is so important to minimize.
If friction is not decreased, you might need shockcord with 3 or 4kg initial force and 8 to 10kg final. That, added to the force made by the sail, is what your crew will have to deal with. So if you don’t fix the friction on land, don’t yell at your crew in the water. (Remember: “Regattas are won on land.”)
F) Conclusions:
i) If you have a two-turn system, choose shockcord with more than 130% maximum stretch. Ideally, a system that works WELL with the least possible force.
ii) Thinner shockcord has less friction, and it allows more stretching under tension to create the same force as a larger diameter shockcord. With a 6mm shockcord that stretches 120% / 140%, you can make systems of 2 or 3 turns without problems.
iii) 8mm shockcord that only stretches 70% works only for 3-turn systems (and is still at the limit, so I do not recommend it).
iv) More force on the shockcord is not always better; do not over tighten it. If you start with a stretch of 40% to 50%, launching will require a lot of unnecessary force. In strong wind, or on a reach, this additional force can be 7 to 10kg and may make the difference between whether your crew manages to set the pole well or not.
v) If you get an elastic that stretches above 130% I recommend using them with a two-turn system only. This will have minimal friction and will work well.
vi) TEST THE SYSTEM! These forces are what work in MY SYSTEM. If yours has more friction, you can only solve it by either decreasing the friction or increasing the shockcord tensión
. This is how all poles should behave:
1) When you release the pole, it returns quickly and stays close to the boom.
2) There is enough shockcord tensión that the pole retracts well for jibes.
3) When launching the pole, the jib’s clew meets the pole tip before the pole goes out. If this does not happen, tighten the shockcord. The pole should not start moving forward until the jib’s clew is very close to or right up against the pole end.
vii) Knots in shockcord, slide easily, especially if it is 8mm. I recommend sewing them in and using a knot with at least two or three turns in it for more security.
viii) My choice is a two-turn system with 6mm black shockcord. (I was using 3 turns because I had a 90% stretch maximum stretch, and I took one off when I got this 140% shockcord). If I test it and it doesn’t work or I see that it requires too much force, I will move onto the other 6mm (“five oceans” brand), which gives me more force for similar stretch. The more force the elastic has, the more my crew has to fight.
ix) LENGTHS TO BUY: The boom measures 2.5m, so for a two-turn system you will need about 4m of shockcord and for a 3-turn system about 6m. Remember that we “take out” 1m or 1.5m to give the right initial tension.
I hope this data will help you.
As always, this is just my opinion; what I do on my boat to never have problems. I am sure there are many other good methods as well.
Good sailing!
Luis Soubie ARG 31701
“HOW TO IMPROVE FAST” is a series of short articles to the sailors who usually end up outside the first third of the fleet in most races.
They are sailors who week after week try to improve, try to repeat what they did in that race in which they finished better. They try to stay in front when they round the first mark near the leaders, but most of the time they fall back without knowing why..
The goal of all this is to provide some technical elements to help them stop committing some recurring errors immediately, so they can see results right away.
Of course, and this needs to be said, this is just my humble PERSONAL opinion, and others will have an equally valid different one. This is what I’ve learned or observed in the 35 years I’ve been racing sailboats, 26 of them under the “fat bird”, and what I try to do or avoid every weekend.
How to Improve Fast – 4. Concentration (the Correct Name of the Game)
How to Improve Fast – 5. Sailing in Light Air
How to Improve Fast – 6. Transitions
Read more about different Pole Launcher Systems
Comments for this post are closed

0 comments